
| Author: Snoopie | |
| Difficulty: Medium | Category: OS9 |
| Time Required: 2 Hours | Index: 002 |
| Published: Jul. 8th 2022 | Status: Verified |
Did you know this article has a Video Guide? Well in case you didn't and are better at following video instructions, it can be accessed here. [>Video<]
This guide is for iBook G4 models shipped between Late 2003 (PowerBook 6,3) and Late 2004 (PowerBook 6,5) with the ATi Radeon 9200 GPU. Mid 2005 (PowerBook 6,7) models with the ATi Radeon 9550 GPU are not compatible with Mac OS9. You can find a list of iBook G4s here.
In my testing this software or any in this guide have been free from issue.. but..
THIS GUIDE, AND SOFTWARE IS PROVIDED WITH ABSOLUTELY NO WARRANTY.
Cant be fixed currently.
Can be fixed with ATi Extension.
Can be fixed with Custom ROM.
As we will be inserting values into the NVRAM to ensure everything goes properly it's good practice to reset it. To do so we must boot into Open Firmware by (with the computer off) pressing and holding "CMD + ALT/Option + O + F" while turning the iBook on.

And once you see the Open Firmware prompt, type "reset-nvram" press enter (return), then type "reset-all".

Upon pressing return again the system will reboot. The NVRAM has been reset!
In order to boot Mac OS 9 on "bare metal" we will need to insert some values into the NVRAM which will trick OS 9 into thinking its booting on a compatible platform, and thanks to the work of.. someone (not me, found it in a forum post) we can add the values easily with a single script.
To do so in OSX open 'Finder' -> 'Applications' -> 'Utilities' -> 'Terminal'. Type 'chmod +x' then drag the script into the terminal window before pressing enter. After that, drag the script in again press enter..
TIP: All dragging in the script does is input its location, you can type it in manually if you prefer.

..then enter your user password if it asks.

The NVRAM has been successfully modified!
In testing I've found the Unsupported OS9 disc to be very unreliable when burned using Windows/Linux hosts so I've found that the best most reliable option is to burn it on the iBook itself. To do so first open Disk Utilty 'Finder' -> 'Applications' -> 'Utilities' -> 'Disk Utility' then drag the image into the disk panel, click it, then click burn.

Once the burn completes, put the disc back into the drive and now we can begin installing :3.
Because OSX's built-in boot picker doesn't detect the OS 9 install disc (because its unsupported.. duh) we need to boot into Open Firmware's boot picker. To do so we must shut the computer down then boot it up again pressing and holding ALT after the iBook "bongs". You should see this:

This is Open Firmware's Boot Picker. To boot into the freshly burned OS 9 CD click the square labeled "MacOS9Lives" then click the right-pointing arrow.
PITFALL: After about 30 seconds at most you should see a  , if you don't see a you'll need to boot into OSX again and re-run the script till you get a .
After the you should now see:

Just.. without the moiré pattern nonsense. Once its done booting close the included README tutorial (it wont help us much as the iBook G4 needs some additional steps) then click on 'Drive Setup' which should already be open, click on your Hard Drive (the type will probably be ATA), click Initialize, then Initialize again.

NOTE: "Initialize" is OS9's term for "Format" and thus initializing will DESTROY ALL DATA on the target disk.
Once the disk is initialized (you should see it on the desktop) we now need to launch 'Apple Software Restore'. To do so double click on the CD icon on the desktop, then launch 'Apple Software Restore'.

Launched? Yes? Now click 'Restore', after about 15 minutes Mac OS 9 should be successfully installed!.. sorta
DONT REBOOT YET!
Once its finished installing, click 'Quit'. Now we need to delete the 'Multiprocessing' folder as it keeps the system from booting fully, so navigate to 'MacOS9Lives' -> 'System Folder' -> 'Extensions'
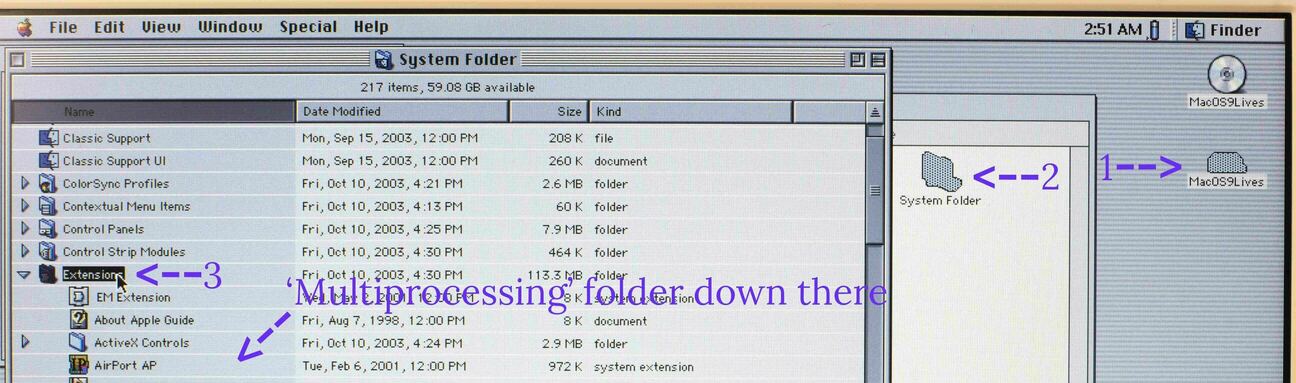
drag 'Multiprocessing' to trash,

then use the 'Special' menu to 'Empty Trash'.

Mac OS 9 is now installed! And you can reboot into your new install. :3
While in its current state the install works there are still some things we can fix.
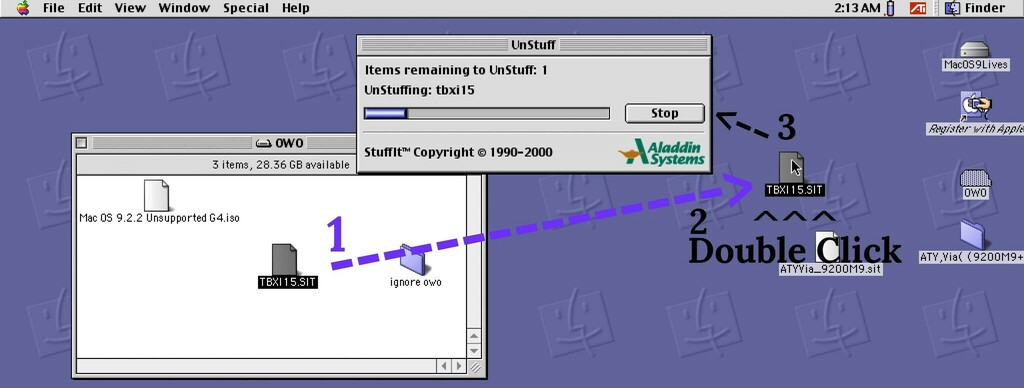
With the OS 9 base system installed we can now enable 2D graphics acceleration. First drag the extension archive to the desktop, then double click it to extract.

Now that the archive is extracted we must open the freshly created folder then move all 12 extensions to 'MacOS9Lives' -> 'System Folder' --> 'Extensions'.

And after a reboot next to the battery icon there should now be an ATi logo:

The ATi Extensions have been successfully installed!~
Now an optional patch you can apply is installing a custom Mac OS ROM. This will allow the system to boot without the NVRAM patches applied earlier, which can be helpful if your iBook looses power for extended periods of time. However this doesn't work perfectly. it will set the LCD brightness to the lowest setting and if left alone for too long the system will freeze excessively in my testing.
But if you wish to give it a try (which if you have time I recommend) you must move the custom rom archive to the desktop and double click it to extract.
With the file extracted click on its label and rename it 'Mac OS ROM'

PITFALL: Failing to properly rename the ROM will cause the system to no longer boot. If you reboot with the special menu entry it will warn you if it was not renamed correctly.
Now to install the ROM, navigate to 'MacOS9Lives' -> 'System Folder' then drag the current 'Mac OS ROM' to 'Trash'.

After its finished transferring to trash, drag the renamed 'Mac OS ROM' into the system folder.

And once its done the Custom ROM has been installed!~ But before you can boot it you will need to reset the NVRAM as in Step 1.
TIP: When you reboot you will probably end up at the blink blink folder screen which is part of OpenFirmware, so to enter the OF prompt in this state you can press "Ctrl + Z" and enter the commands in Step 1 that way.
And its done! Mac OS 9 is now installed on your Unsupported iBook G4 with all patches!~
Looks pretty good huh? I'm surprised this works this well, let alone at all. If you tried this yourself and have anything you'd like to add to this guide please feel free to send me an Email!~ Thanks for reading. ^-^

Hey!~ Thanks for reading the article! I hope you found it useful! If you would like to support the website please consider donating! y'know if you want to c: